Circuit-Works Thermal Paste User's Guide
Reduce Excess Heat and Improve PCB Reliability with Thermal Paste
Step 1: Set-up | Step 2: Remove old paste | Step 3: Clean surfaces | Step 4: Apply paste | Step 5: Attach device
Hi, I’m Grant Price, Product Manager for CircuitWorks brand of PCB repair and prototype products. Today I’m going to provide directions on how to apply thermal paste to a CPU.
Thermal paste is called a lot of names, including thermal compound, heat sink compound, and thermal grease. Its job is to fill the gap between a heat generating device, most commonly a CPU, and the thermal transfer device, or mechanical heat sink.
Why is thermal paste needed? CPU’s run very hot, and that heat needs to be transferred to the mechanical heat sink so it can be dissipated by air, water or refrigerant.
The problem is, even though the surfaces of the integrated heat spreader (or IHS) over the CPU and the base plate of the heat sink appear smooth, there are actually microscopic imperfections. These imperfections trap air, and air is a great insulator.
A great thermal past can withstand years of heat cycling without pumping out of the area it is applied, and without separating.
Now let’s get into directions on how to apply thermal paste.
Step 1: Set up your work area.
CPU’s are extremely static sensitive, so you’ll want to start and finish the job in one sitting. Any movement to get tools or materials increases your chance of generating a charge. You’ll ideally want to be grounded with something like a wrist strap, and have the PCB on a grounded working surface like an ESD-safe mat.
Step 2: If this is a rework or repair project, remove old paste.
Old paste has generally been there for a while, so it is often hardened and difficult to remove. You’ll first have to scrap off as much as you can. I recommend a wooden pick of some sort. Wood is static neutral and less likely scratch the surface. Be really careful not to scratch either the surface IHS or base plate.
Step 3: Clean surfaces.
You’ll then need to clean any remaining old paste with 70% or higher isopropyl alcohol. Have your wipes ready before you get started, because you don’t want take a chance of generating static handling a tub or other packaging. A lint-free cellulose or cellulose-blend wipe is a better choice than a pure synthetic material, which has more of a tendency to generate static.
Rub gently but firmly until all the paste has been removed.
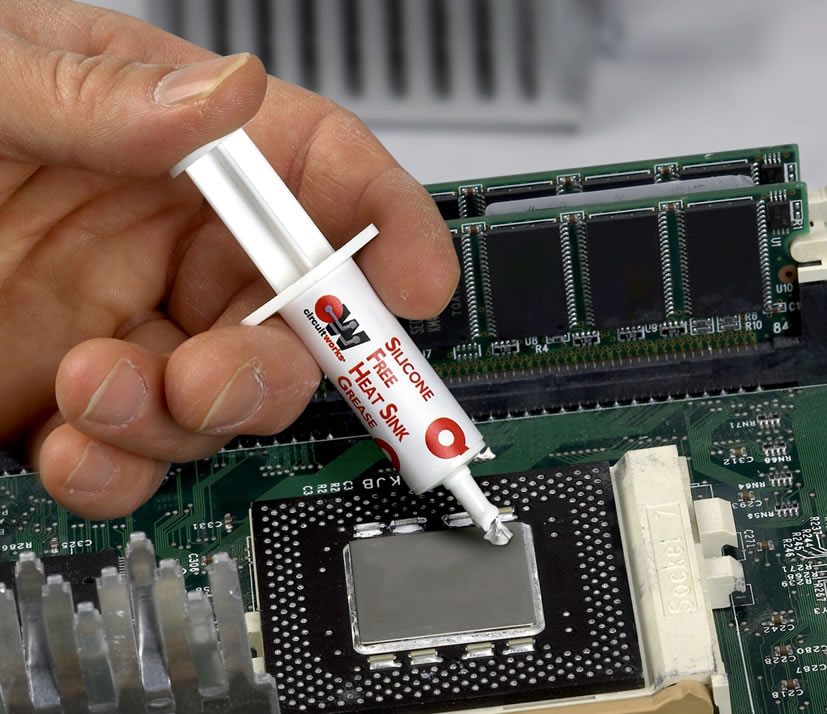
Step 4: Apply a small bead of thermal paste.
Apply a bead that is somewhere between a grain of rice and a pea. You need enough to spread over the surface of the CPU, but so much that it oozes out from the edges of the heat sink.
Let me demonstrate with a slide over the CPU. See how just a small amount spreads out evenly.
Don’t try to spread it. Let the pressure of the base plate spread it out. You otherwise run the risk of creating bubbles.
Step 5: Apply the mechanical heat sink.
Apply the mechanical heat sink directly over the top of the CPU. Hold the heat sink down with light, even pressure as you attach. You don’t need to wiggle it to spread out the thermal paste. The pressure of the heat sink should be enough to do the job.
If there are 4 fasteners, attach them cattycorner to each other, like in an X pattern.
If you make a mistake, remove the heat sink, clean off the thermal paste, and start over. Wet paste removes easily with isopropyl alcohol.
I hope this demonstration was useful to you. If you run into any problems, feel to call or email us, or go to chemtronics.com.
Ask A Technical Question
Stay up-to-date on Chemtronics news, products, videos & more.
Related Products